
Are you ready for a cardigan knit-along that will flip your thinking about colourwork, short rows, and garment construction?
This spring KAL is for knitters who savor the process of making.
The way a cardigan grows beneath your hands, revealing its shape row by row.
The best thing about this cardigan, is that it’s not as complicated as you might think.
Where it all began
My love affair with Short Row Colourwork continues. If you’ve been following along, you might remember the Spring Seasons blog post, where I first shared my obsession with combining short rows and garter stitch to create striking two-colour motifs.(If you missed it, you can catch up here.)
If you’d like a quick recap, this is a technique that uses short rows in garter stitch to create two colour motifs in your knitting. Woolly Wormhead has created a book ‘Short-Row Colorwork Knitting’ about this technique and has a huge selection of different motifs.
When Short rows are used just to create a colourwork technique they will be worked as balanced rows, each stitch will be worked for the same number of rows. So if you have a short row on one side of the work you’ll also have another short row at the other side to balance out the row count for every stitch.
But here’s where it gets really interesting…
What if we stopped using short rows just for colourwork?
What if we also used them for shaping at the same time?

Introducing the Row by Row Cardigan
For my spring knit-along, the Row By Row Cardigan,I wanted to push the boundaries of what a cardigan could be. I’m combining the idea of Woolly Wormhead’s short row motif with short row shaping. Basically I’m showing you the rules for balances motifs while also breaking them to create the shaping I need for the cardigan.
It’s equal parts technical and playful. And who wouldn’t want to knit a garment that way?
This isn’t your average top-down cardigan.
Instead this cardigan is knit in two different directions.
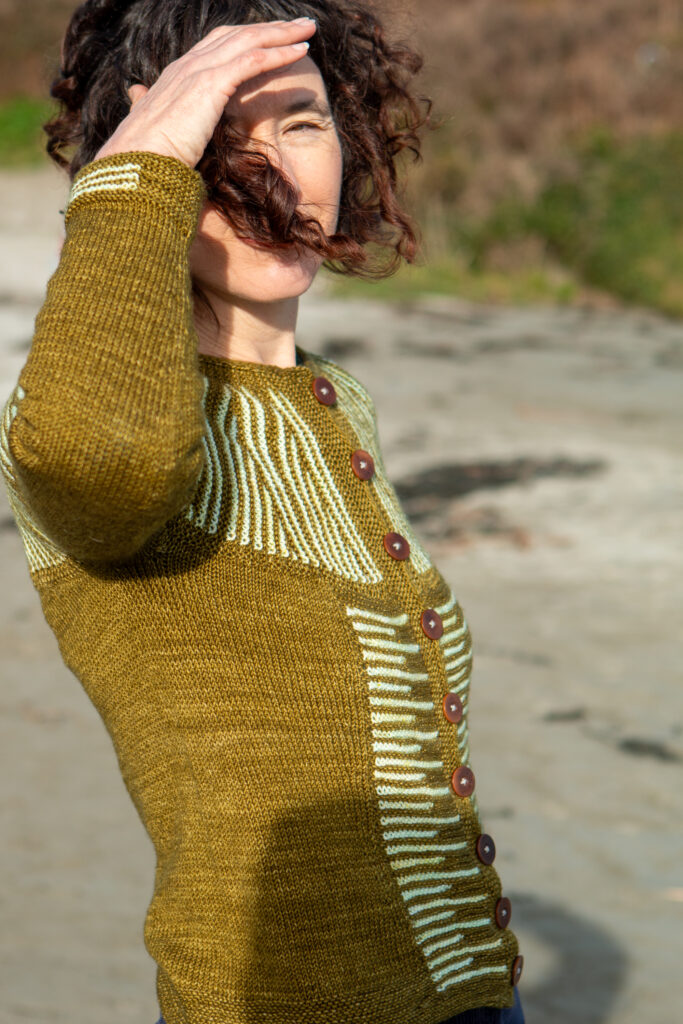
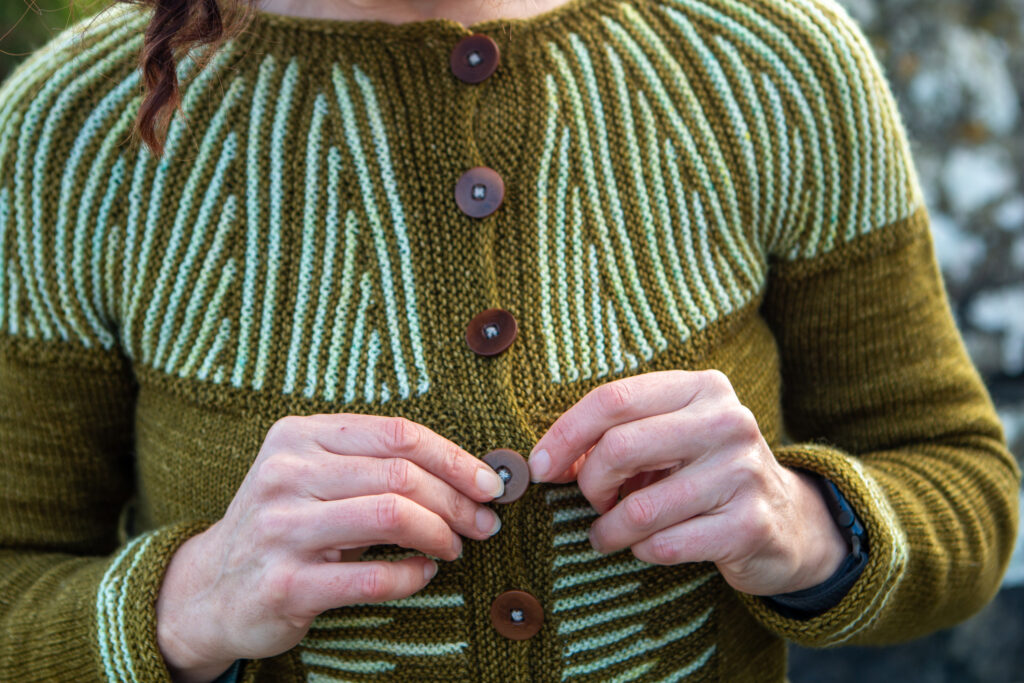
The yoke is initially worked from side-to-side, using short rows to shape the yoke and curve the shape of the garment. By adding more rows at the lower edge and fewer at the neckline, we sculpt a yoke that fits beautifully, and sits how you’d like it to.
At the same time I’m combining two colours to create a short row colourwork motif while also shaping the yoke. This is done with a repeating ‘wedge’ that is worked all the way around. Large sizes will have more repeats and smaller sizes will have less. This creates both colour and movement in the pattern and also gives you the ability to shape or bend fabric to your will.
It’s exhilarating.
It’s deliberate imbalance in your knitting. It’s shaping with personality. It’s a cardigan that keeps you thinking, stitch by stitch.
This KAL isn’t just about following a pattern. It’s about learning the why behind the design.
After you create the yoke this stitches are picked up from the bottom of the yoke and it’s worked seamlessly from the top down. There’s even a few short rows worked across the back at this stage also to raise the back of the neck.
Yes, the cardigan is also seamless. It’s one of my favourite words in garment knitting.

Working the body this way allows us to now introduce a balanced short row colourwork motif at each side of the front. There are alternating colour stripes worked on each side as you work your body. Each worked with it’s own ball of yarn. There is gentle waist shaping shown in the sample but there is also a straight body option show as well.
To finish it out, there is a small colourwork detail added also at the sleeve cuff. It’s just a few alternating stripes to echo the details from the front right to the edges.
So you see, while this cardigan is technical, it’s also extremely approachable because all you really need are Garter Stitch, German Short Rows (and we’ll have all the tutorials for those) and the ability to keep track of your knitting row by row.
And I know you can do that, right?

Yarn
My sample is knit using LITLG ‘Sport’ using the colour ‘Grove’ from the main colour and ‘Mint Grove’ from the contrast. This yarn has a nice twist which shows off garter stitch beautifully.
We will also have kits in both Nua ‘Sport’ and BC Garn ‘Bio Balance’.
Here are all the yarn kit options:
- LITLG Sport (sample yarn) | 100% Superwash Merino, 328 yds / 300 m per 3.53 oz / 100 g – A springy superwash 100% merino yarn. Gives great stitch definition in garter stitch.
- Stolen Stitches Nua Sport | Nua Sport’ 60% Merino, 20% Yak, 20% Linen; 153 yds / 140 m per 1.8 oz / 50 g– A soft, worsted-spun blend of merino, yak and linen that gives a cushioned fabric with elegant drape.
- BC Garn Bio Balance | 55% Organic Wool, 45% Organic Cotton; 246 yds / 225 m per 1.8 oz / 50 g – A blend of wool and cotton perfect for warmer weather climates.
Whichever yarn option you pick you will need the following yarn amounts:
Approximate Yardage
MC: 1064 (1155, 1249, 1354, 1456, 1579, 1673, 1792) yds / 973 (1056, 1142, 1239, 1332, 1444, 1530, 1639) m
CC: 168 (181, 194, 209, 230, 246, 263, 278) yds / 154 (165, 178, 191, 211, 225, 240, 255) m

Spring KAL Timing
Yarn Kits & pattern pre-sale: 5th March 2026, 8pm Irish time (3pm EST)
You’ll find both at this link but not before launch time.
Clue 1: 8th April, 2026
Clue 2: 22nd April, 2026
Clue 3: 6th May, 2026
Final Prize: 27th May, 2026
All digital workshops and tutorials are included free during the KAL and you get to keep them forever!

Ready to cast on?
This KAL is for knitters who are in it for the rhythm, the challenge, the aha moments. Those who love the why behind garment design.
It’s about what you’ll discover between the cast-on and the cuff. Where curiosity meets construction.
If that sounds like your kind of knitting…get ready for the launch on 5th March at 8 pm Irish time.

I have purchased the Row by Row cardigan on Ravelry
I hope you enjoy the KAL!
It’s stunning! And possibly too difficult for me. Could one get by adding less buttonholes or even none? Though it looks like the button band is added toward the end, which makes things easier. I’d opt for BC Garn Bio Balance, and thank you for this option.
Yes for sure! The buttonbands are done afterwards so they would be very easy to adjust.